How to Make Sports Ribbon Hair Ties?
Contents
Sports ribbon hair ties are a great way to show your team spirit and support your favorite athletes!
Checkout this video:
What You Need
Before you start, you will need the following supplies: sports ribbon, scissors, and a hot glue gun. You will also need a hair tie. If you do not have a hair tie, you can use a small piece of ribbon or string.
Supplies
-Tulle in the colors of your choice (I like to use two coordinating colors)
-Scissors
-Ruler or measuring tape
-1/8” or 3mm wide elastic
-Lighter or matches (for singeing the ends of the tulle)
-Needle and thread (optional)
-Hot glue gun and hot glue sticks (optional)
Tools
In order to make your own hair ties, you will need the following materials:
-1/4 inch ribbon
-Scissors
-Lighter
-Measuring tape
-Hair tie
Step One: Cut the Ribbon
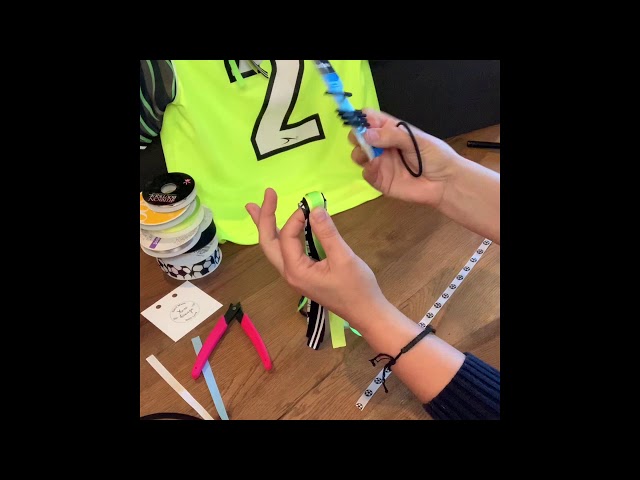
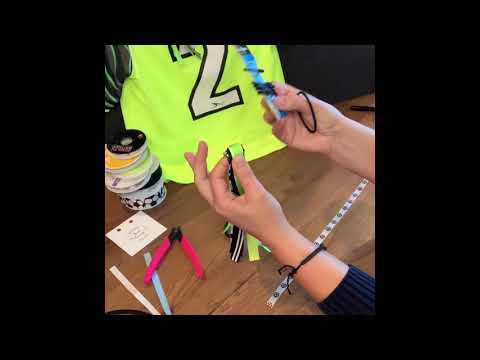
You will need to gather the following supplies to make your own Sports Ribbon Hair Ties: Sports ribbon, scissors, and a lighter. Begin by cutting the ribbon into 18-inch pieces. If you have longer hair, you may want to cut the pieces a little longer.
Length
When cutting the ribbon, you will want to make sure that each piece is about 18 inches long. This will ensure that the finished product is not too tight or too loose. If you are cutting the ribbon yourself, you may want to use a ruler or measuring tape to get an accurate measurement. If you are using premade ribbon, simply cut each piece into 18-inch sections.
Width
The wider the ribbon, the chunkier the hair tie will be. For a classic hair tie, use 3/8″ ribbon. If you want a little more volume, go up to 5/8″ or even 1″ ribbon. The sky’s the limit!
Step Two: Fold the Ribbon
You will need to fold the ribbon in half to make the hair tie. To do this, hold the ribbon so that the wrong side is facing you. Take the top corner of the ribbon and bring it down to the bottom corner. Then, take the bottom corner of the ribbon and bring it up to the top corner. You should now have a ribbon that is folded in half with the wrong side facing out.
Fold in Half
athletically-inclined will love these sporty ribbon hair ties! They would make great gifts for teammates or coaches, and they’re easy to make with just a few supplies. First, you’ll need to gather your materials. You’ll need:
-1/4 inch wide grosgrain ribbon in your team’s colors
-Hair ties
-Scissors
-Lighter
To start, cut two pieces of ribbon to 18 inches each. Then, fold each piece of ribbon in half so that it forms a loop. After both loops are formed, tie the two loops together in a double knot as close to the looped end as possible.
Fold in Half Again
To make the hair tie, you will need to take the ribbon and fold it in half again. This time, you will want to make sure that the ribbon is folded so that the wrong sides are together. When you have done this, take a piece of tape and secure the middle of the ribbon. You will now have a long, thin strip of ribbon that is ready to be made into a hair tie.
Step Three: Sew the Ribbon
After you have cut the ribbon to the desired length, it is time to sew the ribbon. You will need a needle and thread for this step. Start by threading the needle and tying a knot at the end of the thread. Then, start sewing the ribbon from the middle of the ribbon and work your way out. Once you reach the end of the ribbon, tie a knot to secure the ribbon in place.
Position the Ribbon
To make the ribbon hair ties, you will need:
-1/4 inch wide ribbon
-Scissors
-Lighter
-Needle and thread (optional)
Instructions:
1. Cut a piece of ribbon that is about 18 inches long. If you want to make multiple hair ties, you can cut several pieces of ribbon at once.
2. Fold the ribbon in half, making sure the ends are lined up evenly. If your ends are not even, try to straighten them out before moving on to the next step.
3. Tie a knot around the center of the folded ribbon, making sure it is tight against the ribbon. You may want to use needle and thread to sew this knot in place for extra security.
4. Cut each end of the ribbon at an angle, giving it a nice “v” shape. This will help prevent fraying later on.
5. Use a lighter to gently singe the cut ends of the ribbon, being careful not to burn yourself or the ribbon. This will also help prevent fraying later on.
Start Sewing
Start sewing close to one end of the ribbon. You can hand-sew this or use a sewing machine. If you are using a sewing machine, set it to a fairly small zigzag stitch. Once you have sewn about an inch from the end of the ribbon, start zigzagging back and forth over the elastic. As you sew, stretch the elastic out so that it is lying flat against the ribbon. This will help prevent it from gathering up and making your hair tie look lumpy. Continue zigzagging until you reach the other end of the ribbon, then sew back and forth over the elastic a few more times to secure it in place.
Step Four: Finish the Ribbon
To finish the ribbon, you will need to make a small loop and then tie a knot. You can make the loop as big or small as you want. Once you have made the loop, take the ends of the ribbon and put them through the loop. Then, pull the ends of the ribbon until the knot is tight.
Trim the Ribbon
Now that you have your ribbon to the desired length, it is time to finish the ends. You have a few options for this step:
-You can use a lighter or matches to singe the ends of the ribbon. This will help keep it from fraying.
-You can use a hot glue gun to glue the ends of the ribbon together.
-You can use clear nail polish or fabric sealant to coat the ends of the ribbon. This will also help keep it from fraying.
Tie a Knot
Tie a knot close to the band, make sure it’s tight against the band. You don’t want a big knot at the top of your bow.
Now you’re ready to wear your new hair tie!